Quick Navigation
On September 10, 2024, Apple finally released the highly anticipated iPhone 16 series. Many people are likely considering trading in their old iPhones for an upgrade. Whether you plan to sell your old iPhone or use it for a trade-in, it’s crucial to fully erase all personal data and disconnect the old iPhone from your other Apple devices and Apple ID. But how exactly should you go about it? Does it sound complicated? Don't worry—this article will provide you with a detailed checklist and step-by-step guide to help you securely wipe your iPhone to sell.
7 Must-check Things Before Wiping iPhone
Wiping iPhone means that all data on the device will be permanently erased. Therefore, before starting the clear process, there are a few crucial steps you need to confirm. These steps will help prevent the loss of important information and files, and also get your iPhone ready for sale.
Tip:
Once you've completed these checks, you can click here to jump to the next section and begin the wiping process.
1. Back Up Your iPhone
Backing up your iPhone data is crucial because it ensures that your personal information, photos, contacts, app data, and more are safely stored in case you erase your device or experience unexpected data loss. Therefore, before starting the process of wiping your iPhone, make sure to back it up. You can back up your iPhone using either iTunes or iCloud.
Back Up iPhone via iTunes
Step 1. Connect your iPhone to your computer via USB and open iTunes.
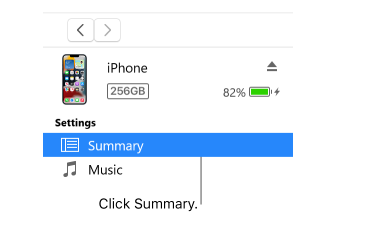
Step 2. Click the "Device" button near the top left corner of the iTunes window.
![]()
Step 3. Click the "Summary" button from the left panel.
Step 4. Then, under the "Backups" section, click the "Back Up Now" button.
Back Up iPhone via iCloud
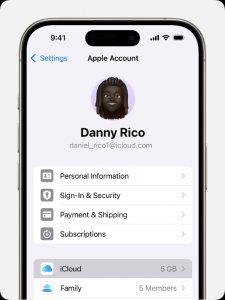
Step 1. Go to Settings > [Your Name] > iCloud > iCloud Backup.
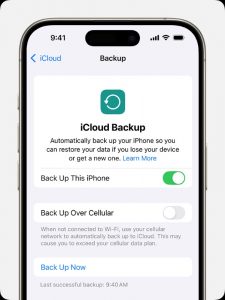
Step 2. Turn on "Backup This iPhone". When your iPhone is connected to power, locked and connected to Wi-Fi, iCloud will automatically back up your iPhone.
Step 3. If you want to back up manually, tap the "Back Up Now" button. Stay connected to your Wi-Fi network until the process ends.
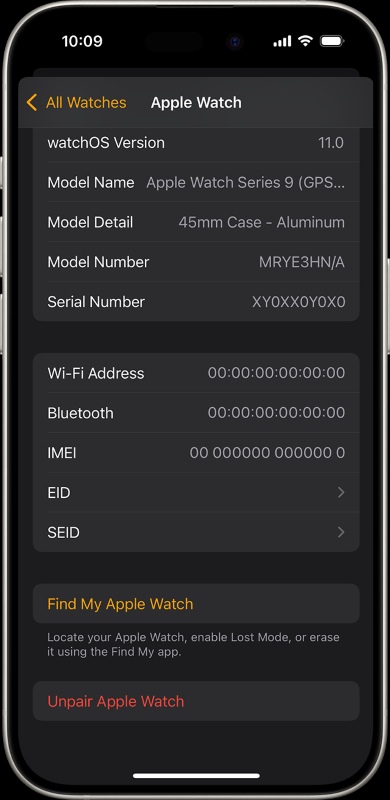
2. Unpair Your Apple Watch
If your iPhone is paired with an Apple Watch, you need to unpair it before wiping your iPhone. If not unpaired, the Apple Watch may have trouble pairing and syncing with a new iPhone, and important data like health information, activity records, and other data on the watch could be lost or unrecoverable.
Unpair Apple Watch
Step 1. Open the Apple Watch app on your iPhone.
Step 2. Select the "My Watch" tab and tap "All Watches".
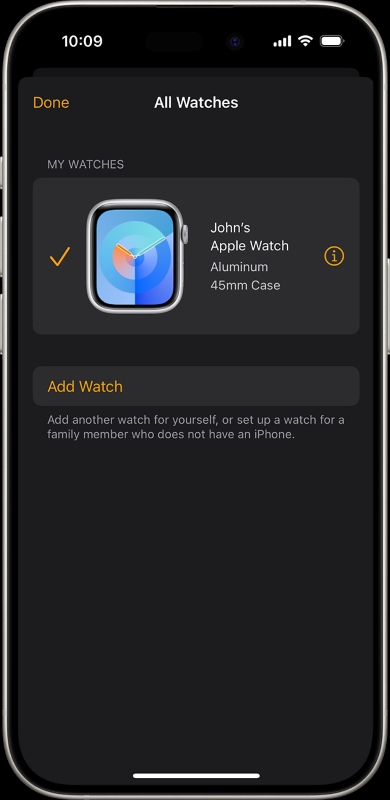
Step 3. Choose the Apple Watch you want to unpair.
Step 4. Tap the "I" icon next to the watch.
Step 5. Finally, select "Unpair Apple Watch".
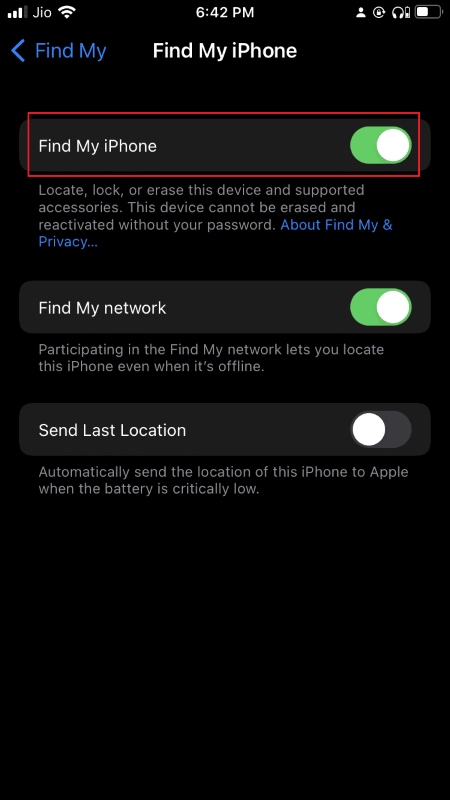
3. Turn off Find My, iMessage, Facetime
Before wiping your iPhone, make sure to turn off Find My, iMessage, and FaceTime. These steps help completely disconnect your device from your Apple ID, preventing any privacy leaks and ensuring the device can be set up and used smoothly by the new user.
Turn off Find My
Step 1. Open the Settings app on your iPhone and tap Your Name > Find My.
Step 2. Tap "Find My iPhone".
Step 3. Toggle the "Find My iPhone" switch to the off position.
Step 4. Enter your Apple ID password to confirm turning it off.
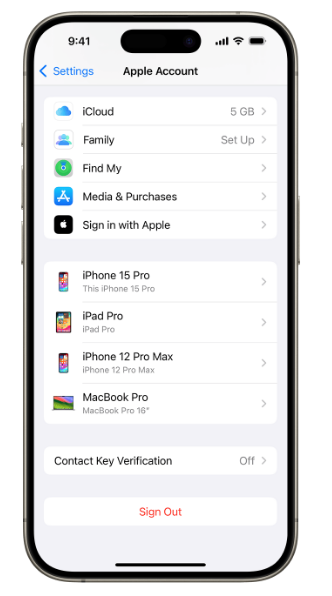
4. Sign Out of iCloud, Credit cards, Email Accounts
After turning off the features mentioned above, the next step is to ensure that you log out of all accounts, especially iCloud, credit cards, payment accounts, and email accounts, to safeguard your information.
Log Out of iCloud
Step 1. Go to Settings > Your Name.
Step 2. Scroll to the bottom and tap "Sign Out".
Step 3. Enter your Apple ID password and tap "Turn Off".
Step 4. Tap "Sign Out".
Step 5. Tap "Sign Out" again to confirm that you want to log out of iCloud.
5. Remove iPhone from Your Apple Account
It’s also important to remove your iPhone from your Apple account and ensure it’s no longer associated with your account. This helps protect your personal privacy by preventing the new user from accessing your previous Apple ID and related data. Additionally, it ensures that the new user can set up and use the device without issues.
Remove iPhone
Step 1. Visit iCloud.com and log into your Apple account.
Step 2. Go to the Find Your Devices section and click “Find Devices”.
Step 3. Select the iPhone you want to remove from the All Devices list.
Step 4. Click "Remove This Device" to remove your iPhone from your account.

6. Remove SIM Card
Before you begin wiping your iPhone, remember to remove the SIM card, which can help prevent any network connection issues during the restoration or reactivation of the device and also protect your personal information from unauthorized access. Once the SIM card is removed, you can proceed with the next steps.
7. Screenshot iPhone Neccessary Info
It's advisable to take screenshots of important information such as the IMEI, MEID, maximum battery capacity (battery health), and the "About" page. This not only helps the buyer verify the phone’s details but also provides evidence for you in case of issues, such as a buyer claiming a replacement or return.
Wipe Your iPhone
After you've backed up all your data and completed the checks mentioned earlier, you're now ready to erase your iPhone. Rest assured, your iCloud data won't be deleted. Before starting, make sure your iPhone is connected to Wi-Fi and has at least 50% battery to avoid any interruptions. Here are the steps to erase your iPhone:
Step 1. Open the "Settings" app and go to General.
Step 2. Scroll down and tap "Transfer or Reset iPhone."
Step 3. Select "Erase All Content and Settings."
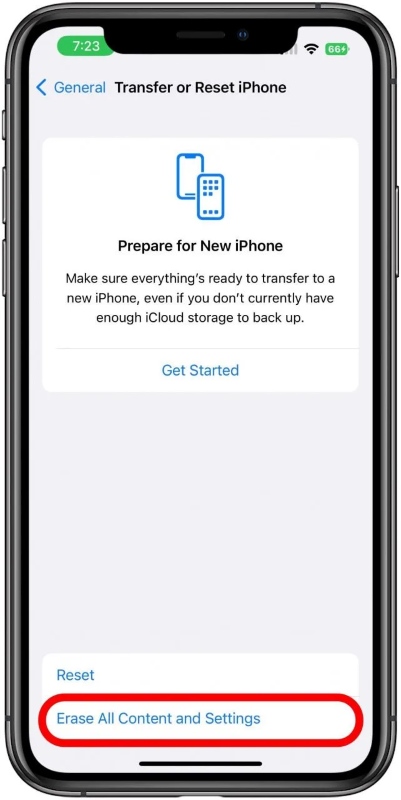
Step 4. Enter your Apple ID password to confirm, then tap "Erase iPhone."
You can try using third-party software like Passvers iOS System Recovery. It offers three modes to repair iOS issues, including Free Quick Fix, Standard Mode, and Advanced Mode. This software is free, quick, and effective at wiping your data clean, regardless of your iPhone model or system version.
FAQs of Clearing iPhone Before Selling
If I erase my old iPhone, will it affect my new one?
No, erasing your old iPhone will not affect your new one. The process of wiping your old device simply clears the data and settings to ensure your privacy is protected from the new owner. As long as you log in and restore your data on your new iPhone, you can continue using it without any concerns about data conflicts or impacts.
What if I can't connect my iPhone to Wifi to wipe it?
If you’re unable to connect your iPhone to Wi-Fi to perform the erase, you can put the device into DFU mode and erase it using iTunes. Here are the general steps:
- Connect your iPhone to your computer, then quickly press the Volume Up button followed by the Volume Down button.
- Press and hold the Side button until the screen goes black.
- Release the Side button, then hold both the Side button and Volume Down button for approximately five seconds.
- Release the Side button but keep holding the Volume Down button.
- Wait for at least five seconds for iTunes to detect that the iPhone has entered DFU mode.
After erasing the iPhone in DFU mode, remember to visit iCloud to remove the device from your account to ensure it is no longer associated with your Apple ID.
After Erasing Your iPhone
Once the erasing is complete, the device will restart and display the "Hello" or similar welcome screen, indicating that the process was successful. At this point, you can confirm that the device has been fully wiped and now it is ready to sell.