Quick Navigation
Fail to update your iPhone or iPad with the error "unable to check for update"? Try 7 common fixes or the professional tool Passvers iOS System Recovery to effectively solve the problem.
"When I try to update my iPhone 15 to iOS 18, the new available iOS profile is not showing up, and instead, I see a message saying that 'Unable to Check for Update. An error occurred while checking for a software update.' What can I do to fix that and update my phone?"
The problem that an iPhone or iPad is unable to check for update errors sometimes happens in OTA updates. After clicking Software Update, the iPhone or iPad first shows "Checking for Update" and then ends up with the error "Unable to Check for Update". This problem is usually annoying, especially when it appears again and again, and you have no idea about the reason.
Here we provide 7 quick fixes for you to identify the reason or solve the problem. If you have already tried most of the common ways and think there may be a tricky system error, you can also go to Solution 7 directly to solve it with a third-party tool.
Solution 1. Make Sure Apple Servers Are Not Down
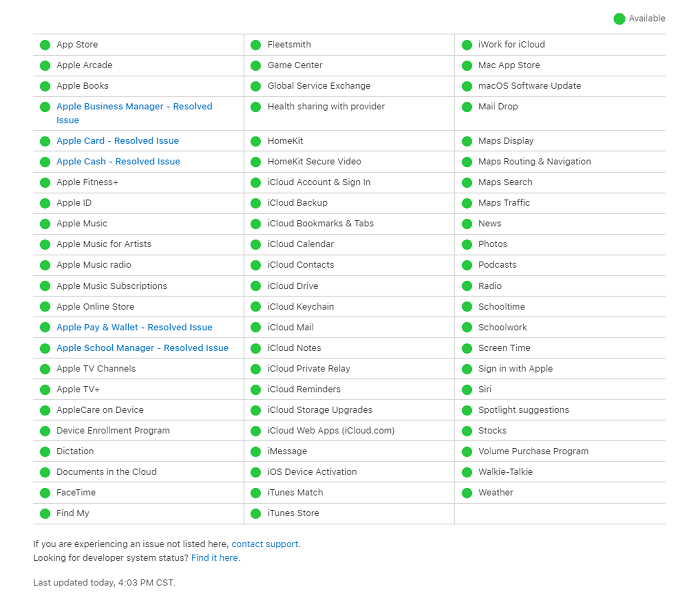
When your iPhone or iPad checks for updates, it has to communicate with the Apple servers. If Apple servers are down, naturally your iPhone is unable to check for updates or says iPhone update requested. So, there is the possibility that the iOS 18 update failure is not caused by internal reason but some external elements. In order to check it, pay a visit to the Apple System Status web page to see whether the servers are available.
If the icons show green, it means they are running normally. Then you can attribute the iPhone update failure to other reasons and try other alternatives to fix the issue. If there are yellow, red icons, or blue icons with annotations, you can wait for the servers to get back to normal and try to update once again later.
Solution 2. Ensure a Good Network Connection for Software Update
The "Unable to Check for Update" problem is usually due to a network issue. Since the iOS OTA update requires a stable and smooth network condition, you need to make sure your iPhone/iPad has good Wi-Fi signal strength.
If it seems that your Wi-Fi connection is weak while other devices can use it normally under the same connection, here are three ways to help you fix the network problem on your iPhone or iPad.
1. Reconnect Wi-Fi
Head to Settings > Wi-Fi. Toggle off Wi-Fi for several minutes. Turn it back on again and reconnect. Then go to Software Update and see if your device is unable to check for iOS updates.
2. Connect to Another Wi-Fi Network
If the reconnection doesn't work, you may need to try other working Wi-Fi networks. Head to Settings > Wi-Fi. Disconnect the current Wi-Fi network and connect to another effective one.
3. Reset Network Settings
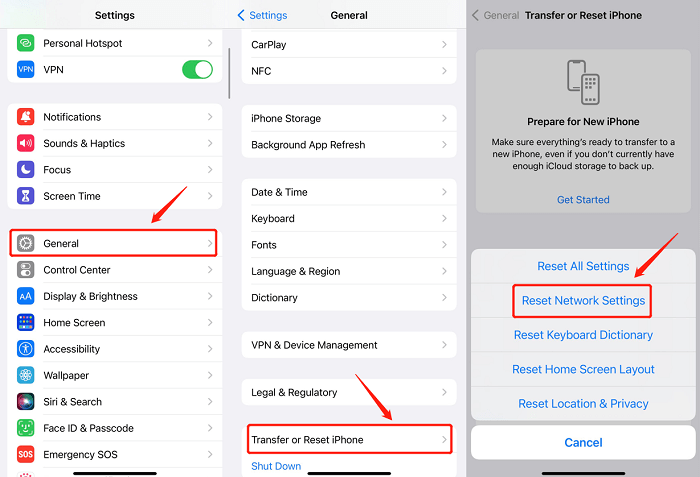
If there is still an error in checking for software updates on your iPhone or iPad, try to reset the network settings. Open Settings > General. Scroll down and tap Transfer or Reset iPhone. Tap on Reset Network Settings.
Solution 3. Change to Google's Public DNS
But you may also find that you cannot check for updates on your iPhone while you can smoothly use other applications to watch videos or chat. In this case, your iPhone's failure to update is probably not because of the weak network. So, you can instead try the following one that some users find useful, which is to switch your Internet network to Google Public DNS.
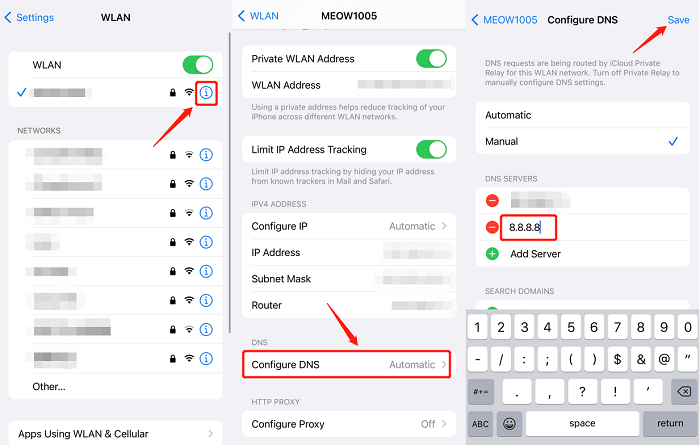
Step 1. Head to Settings > Wi-Fi.
Step 2. Tap the blue info icon next to your current Wi-Fi network.
Step 3. Tap on "Configure DNS" > Manual > Add Server and type the DNS servers: "8.8.8.8" or "8.8.4.4". Then, choose the DNS and click "Save".
If none of the above methods work and your iPhone is still stuck on checking for update, the error is basically not caused by a network issue but a system issue or other. Read on for more solutions.
Solution 4. Force Restart iPhone/iPad
A simple but feasible way to repair some subtle system errors is to reboot your iPhone/iPad. After restarting your iPhone, head to the Software Update page to check whether it can update normally or not. Because rebooting is frequently used by most users and you are likely to know about the operation, we will not talk more about it here.
What if reboot still doesn't help? You can go further and try to force restart the iPhone or iPad that is unable to check for updates on iOS 18. Different generations of iPhones have different ways to hard reset the phone.
Hard Reset iPhone XR/11/12/13/14/SE 2nd
Quickly press and release the Volume Up button, and do the same as the Volume Down button. Then press and hold the side (or top) button until the Apple logo appears.
Note:
To force restart the iPad without a Home button, you can do the same way as this method.
After the hard reset, now you can go to the Software Update page again to see if there is an error that occurred while checking for a software update.
Be aware that iOS 18-supported devices are only compatible with iPhone SE 2nd generation and other models such as iPhone XR and above. Still, if you meet with problems when installing an update on iPhone X or previous Apple phones, you can try out the following resetting steps to fix the unable-to-check-for-update issues.
Note:
iPhone 8 and iPhone X reset steps are similar to the model of iPhone XR and later.
Hard Reset iPhone 7/7 Plus
Press and hold the Power button and the Volume Down button at the same time for several seconds till you see the Apple logo.
Hard Reset iPhone 5/6/SE 1st
Press and hold the Power button and Home button at the same time until the Apple logo appears. It usually takes about 10 seconds.
Note:
To force restart the iPad with a Home button, you can do it the same way as this method.
Solution 5. Delete iOS 18 Beta Version Profile
Besides, there can also be a problem with your iOS files. If you have downloaded the previous iOS 18 Beta version on your iPhone/iPad, the new iOS update may not show up. To solve this, just delete the beta files first and then try to check for updates again.
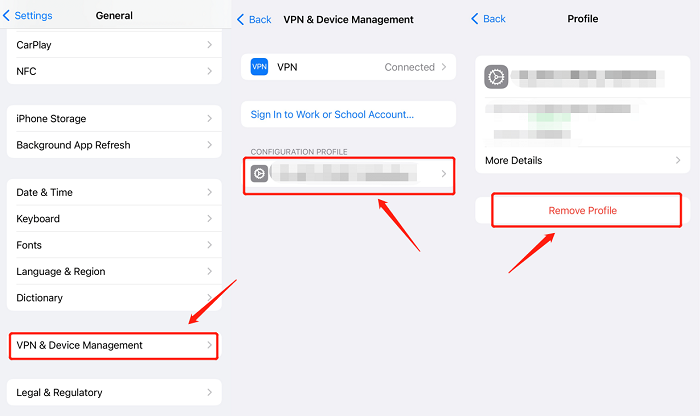
Step 1. Go to Settings > General > VPN & Device Management.
Step 2. Tap the iOS Beta Software Profile under Configuration Profile.
Step 3. Tap "Remove Profile" to delete the beta update profile.
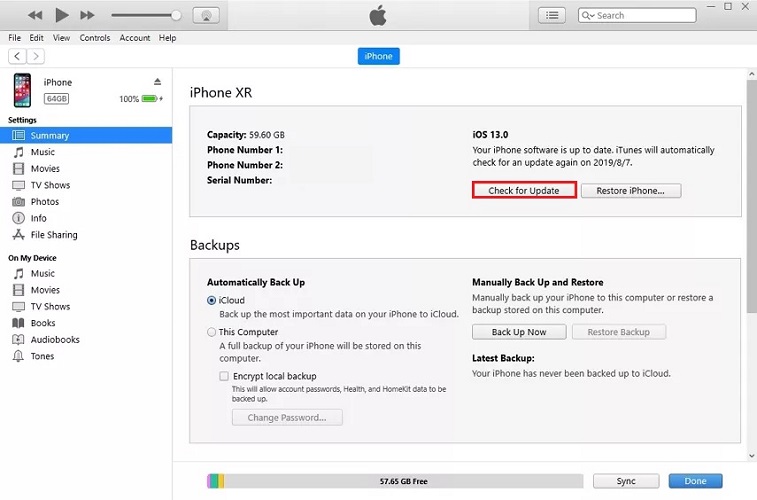
Solution 6. Check for Update with iTunes
It could be frustrating after you've tried all the solutions above, your iPhone/iPad is still unable to check for updates via OTA update. However, don't give up now. It's still possible to solve it with the help of some software. The first choice is to use iTunes to help you update your iPhone to the newest iOS version.
Step 1. Connect your iPhone/iPad to the computer.
Step 2. Launch the latest version of iTunes.
Step 3. Open the Summary tab.
Step 4. Click on "Check for Update" and then choose "Download and Update".
Step 5. Reboot your iPhone/iPad after the update and you'll get the newest iOS version on your device.
Solution 7. Check for Update with Third-Party Tool
If unluckily, all the common fixes fail to work, the best solution for you should be to use a professional third-party tool to update your iPhone, for example, Passvers iOS System Recovery.
It is an iOS system recovery tool that aims at solving different iOS system problems from small errors to big issues, such as iPhone update failure, iPhone stuck in headphone mode, iPhone black screen, etc. So, it can exactly help you bypass the iPhone's inability to check for update problems and update your working iOS device to the latest iOS 18.
The software offers 3 modes to fix iOS issues. Among them, there is a Free Quick Fix mode that can solve simple problems like update failure at no charge. Besides, it's fully compatible with all iPhone models including the newest iPhone 16.
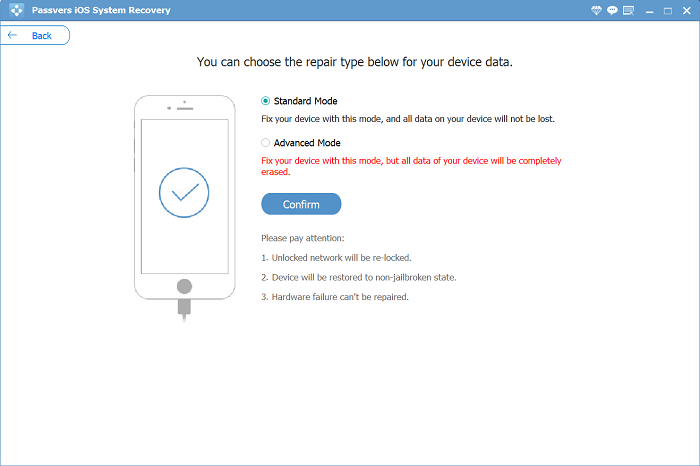
Step 1. Download and install Passvers iOS System Recovery on your PC/Mac.
Step 2. Connect your iPhone to the computer. Then try Free Quick Fix, which is free and repairs devices without deleting any data. If you cannot see such a mode, please click Start > Standard Mode > Confirm.
Tip:
Under standard mode, you can also update your iPhone without losing data.
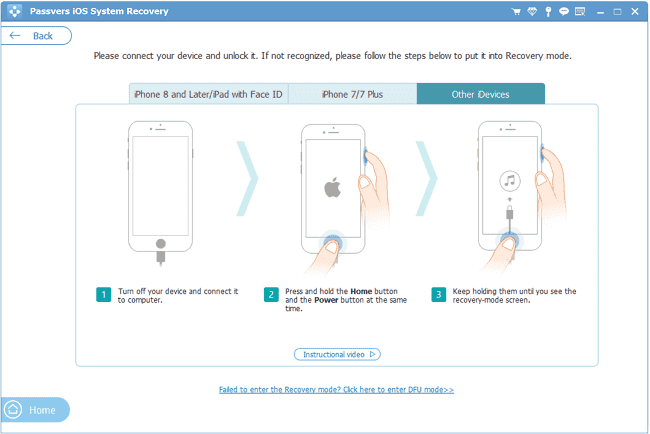
Step 3. Follow the guide to put your iPhone in Recovery Mode.
Step 4. Check if the information of your device is correct or not. Choose the iOS update version you want and then click on Repair. The program will download the firmware file of the newest iOS 18 and get your iPhone updated.

Step 5. Keep your iPhone/iPad connected until the process is completed. Your iPhone/iPad will reboot and update to the latest iOS 18.
Note:
If the first two modes don't work for repairing and you want to use the Advanced Mode, be careful, because it will erase all the data on your iPhone/iPad.
Have you fixed the "Unable to Check for Update" on your iPhone/iPad successfully with any solution above? Hope this article can be of help. And if your issue cannot be fixed, welcome to drop your question to us.