Quick Navigation
iPhone is one of the best smartphones, yet frustrations may arise when it comes to signal reception. Whether you are in the sparsely populated suburbs or the bustling city center, the iPhone no service issue can become a stumbling block. But rest assured, this post has compiled eight of the most effective solutions to help you fix no service on your iPhone. Beyond basic settings, you can explore advanced methods like Passvers iOS System Recovery. It promises an easy-to-grasp and permanent resolution and can ensure a smoother experience with your device. To explore this and other workable fixes, let's dive in right now!
💡 You May Also Like:
Best iOS System Recovery Software Reviews for 2024
The Ultimate Guide to Unbrick Your iOS Devices
Why Does My iPhone Say No Service?
Why does your iPhone say no service? One possible reason is the failure to pay the bill on time. However, if this is not the case for you, the iPhone no service issue may be related to the carrier, device settings, or the system. Specifically, common scenarios include:
- Airplane mode is enabled during travel;
- You are not in the service area of your carrier;
- Your carrier's network problems remain unresolved;
- iOS system updates have changed some settings;
- App's bugs and defaults impact mobile service;
- No service on a new iPhone may be because the SIM card is not activated or the selected carrier plan is terminated.
Although the causes may seem diverse and varied, they are all easily fixable. The following eight solutions are tailored to address each specific issue. Now, scroll down and help your iPhone get out of the no service problem.
1. Toggle Airplane Mode
Whether you've left airplane mode on or connected to a service with no success, toggling airplane mode is the quickest and most effective way to solve the no service on iPhone. It is advisable to try this in urban areas or places with strong signals, and here is how it works.
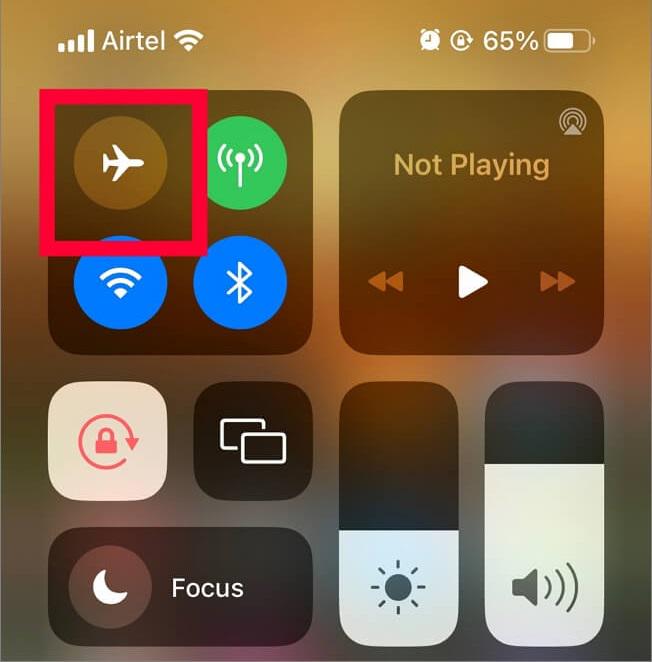
Step 1. Open "Control Center."
- For iPhone X and newer: swipe down the screen from the upper right corner;
- For iPhone 8 Plus and older: swipe upward the screen from bottom to top;
Step 2. If the "Airplane" icon is orange, just tap it to turn it off. Or instead, you can keep it on for a while, and then disable it. This can help your iPhone re-establish a connection with the carrier network
💡 Tip:
You can also find and toggle "Airplane Mode" from the "Settings" app.
2. Turn On and Off the Cellular Again
At times, even when the iPhone shows "no service," you can still make calls and send messages, but the cellular network may be undesirable. In such cases, attempt to re-enable Cellular Data in Settings, which has a similar effect to the first method above. To try this, you also need to ensure you're in an area with cellular network coverage, then refer to the steps below.
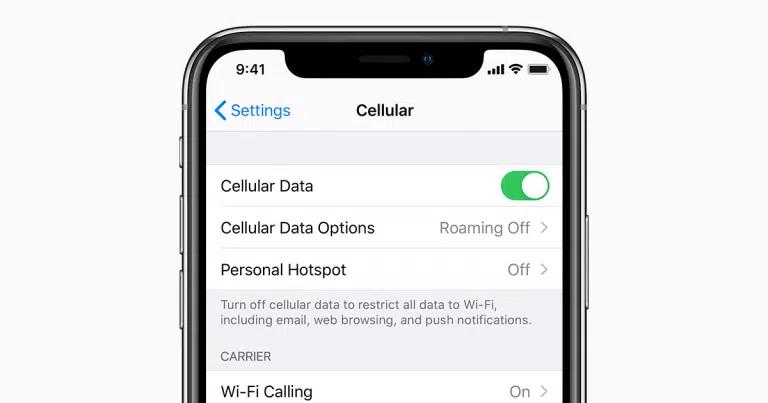
Step 1. Open the "Settings" app and find "Cellular' or "Mobile Data";
Step 2. Turn off the "Cellular Data" switch, and then turn it on again;
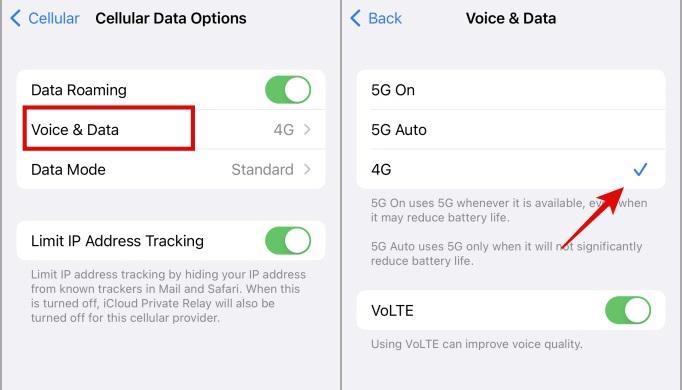
Step 3. If you want to improve the speed of cellular, go to "Cellular Data Options" and choose 4G or 5G.
3. Check the Coverage Area
The first two solutions to address no service on iPhone are more effective within specific coverage areas. This is because certain carrier networks have limited coverage in specific areas. In remote areas, forests, or underground locations, carrier networks may either have limited or no coverage, leading to your iPhone saying no service. To overcome this issue, try to move closer to populated areas such as cities or villages, where your device can regain a signal.
However, if you encounter this problem in a city center, it may be due to interference caused by tall buildings and a dense population. At this time, it is suggested to move towards higher floors of buildings or walk a few miles away from your current blocks.
💡 Note:
When you enter a coverage area, promptly toggle Airplane Mode or re-enable Cellular Data, as both allow you to visually check whether the service has been restored.
4. Switch Cellular Data Options
Not only iPhones but many smartphones no longer support 3G cellular networks. This is primarily owing to the gradual phasing out of old 3G technology by major carriers like AT&T. If you are still using a 3G network on your iPhone, therefore, you are likely to see iPhone says no service. A simple resolution is to reach out to your carrier to upgrade your plan and switch the cellular data option on your iPhone. Here is how it works.
Step 1. Launch "Settings" on your iPhone. Then go to "Cellular" (or "Mobile Data");
Step 2. Locate "Cellular Data Options" from "Cellular Data";
Step 3. Enter the interface of "Voice & Data" and select "4G" or "5G". For always 5G, choose "5G Auto" instead.
💡 Contacts for Major Cellular Providers
- AT&T: 800-288-2020
- T-Mobile: 800-937-8997
- Verizon: 800-922-0204
- MetroPCS: 888-863-8768
- Boost Mobile: 866-402-7366
- Cricket: 800-274-2538
- Virgin Mobile: 888-322-1122
5. Update Carrier Settings
The iPhone no service problem is closely linked to cellular network performance. Besides updating your carrier plan as mentioned earlier, you can also attempt to manually update Carrier settings on your iPhone. Usually, carrier updates happen behind the scenes, and these updated settings not only protect against malicious software threats but also introduce new features to improve speed, performance, and connectivity. For a specific update process, refer to the steps below.
Step 1. Make sure your device connects to Wi-Fi or a mobile hotspot;
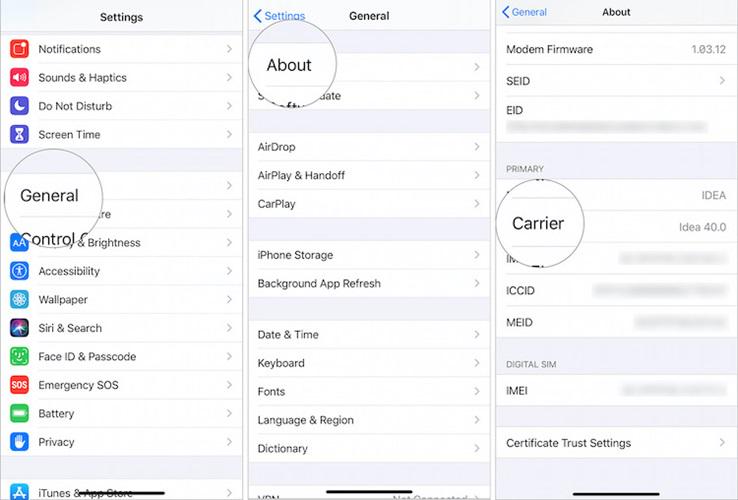
Step 2. Open Settings and head to "General" > "About";
Step 3. Tap "Carrier" and follow the on-screen instructions if there are available updates.
💡 Note:
If you insert a new SIM card into your iPhone, downloading Carrier Settings is a must-do option for the new carrier. Before this, your iPhone has no service.
6. Reset Network Settings
If the above methods to enhance cellular network connectivity and performance don't solve no service on your iPhone, you need to reset network settings. This method will restore all network settings to default. On this basis, it will address underlying network configurations and help you retrieve signal reception.
However, it's important to be aware that network resetting will erase all saved Wi-Fi passwords, VPN, APN settings, and even carrier information. If you have backups for these, follow the steps below to reset network settings on your iPhone.
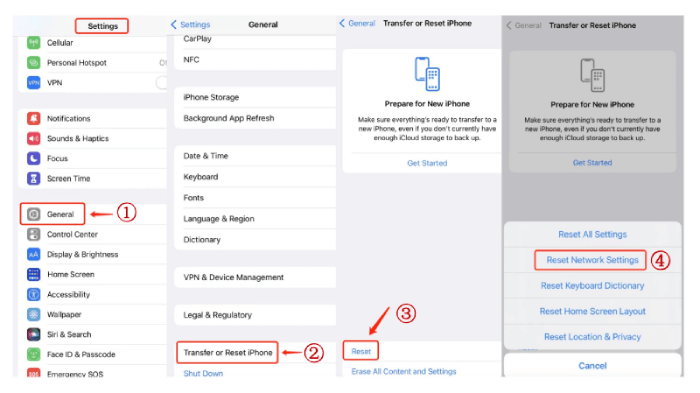
Step 1. Open the Settings app on your device;
Step 2. Navigate to "General" > "Transfer or Reset iPhone", and tap "Reset";
Step 3. Choose "Reset Network Settings" from all options and enter your passcode to confirm the process.
💡 Note:
If your iPhone still shows "no service" after resetting the network, it might be indicative of a device system or hardware issue. For the former, you can use Passvers iOS System Recovery to resolve it, while the latter may require a visit to a repair shop for maintenance or replacement of device parts.
7. Restart Your iPhone
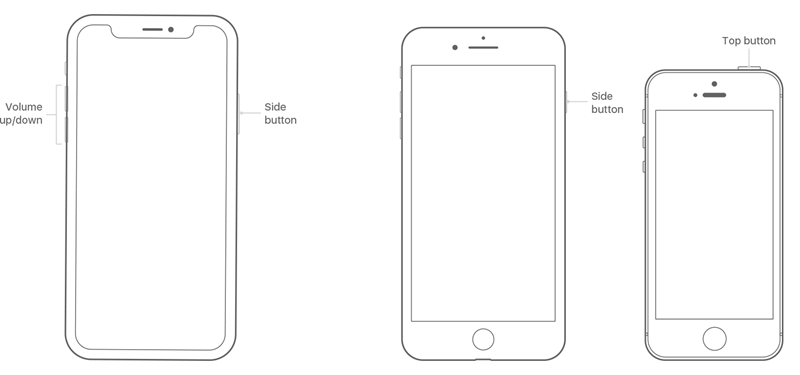
As noted, the iPhone no service problem is also associated with software or system errors. The best way to address these errors is to restart your device. With this method, your iPhone will clear the running memory, resolve temporary software and system errors, and can also fix any unidentified network issues. However, the iPhone reboot may vary depending on the model. Follow the specific steps to try.
For iPhone X and later:
- Hold down either the volume button and the side button until you see the power-off slider;
- Drag the slider to turn off your iPhone;
- To restart the device, press and hold the right side button until the Apple logo shows.
For iPhone 6, 7, 8, or SE (2nd or 3rd generation):
- Hold down the side button till the power-off slider appears;
- Similarly, drag the slider to turn off your iPhone;
- Press and hold the side button to restart your iPhone.
For iPhone SE and earlier
- Press and hold the top button to enable the power-off slider;
- Similarly, drag the slider to turn off your iPhone;
- Hold down the top button to restart your iPhone.
8. Use Passvers iOS System Recovery (High Success Rate)
If a restart fails to resolve the iPhone no service issue, it indicates that there are still software and system problems within the device. At this point, turning to a reliable iOS system repair tool is a recommended choice.
Passvers iOS System Recovery is one of the most reliable iOS repair tools you can count on. Compatible with both Windows and Mac, this top-tier software can connect to almost all models of iPhones. It prioritizes efficiency and effectiveness with three repair modes. The Quick Fix and Standard modes enable swift system repairs, while the Advanced mode can address deep-seated system or software errors in your iPhone.
Moreover, as a versatile tool, Passvers can handle 50+ iOS system problems, whether your device is in no service, black, frozen, or disabled screen. Better yet, without a complex interface, Passvers iOS System Recovery is easy to access for any user.
Sparkling Features of Passvers iOS System Recovery
- Support all models of iPhone from iPhone 4 to the latest 15 series;
- Enable straightforward iOS error repairs without relying on iTunes;
- Easy to handle iOS system issues in more than 50 scenarios;
- Offer clear and explanatory instructions for crucial steps;
- Ensure secure in-app performance with a high success rate.
Now, check the tutorial below and use Passvers iOS System Recovery to get rid of the no service on your iPhone with an extremely high success rate.
Step 1. Launch Passvers iOS System Recovery
Download Passvers iOS System Recovery on your computer by tapping the button below. Then launch it and click "Start" to proceed.
Step 2. Connect Your iPhone to Computer
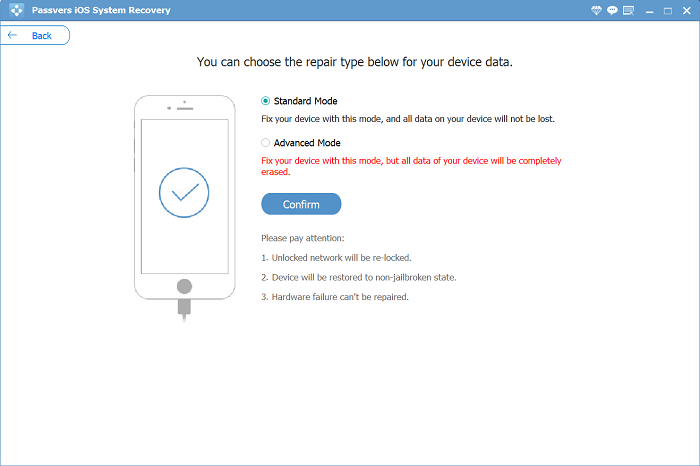
Connect the iPhone with no service to your computer with a USB cable. Then, Passvers iOS System Recovery will automatically detect it and offer you three repair modes to choose from. You can select "Quick Fix" and "Standard" modes in the first place. Both of the options will keep iPhone data safe and sound.
Step 3. Put iPhone into Recovery Mode
Free Quick will proceed with the repair directly. If you choose "Standard" mode instead, confirm your iPhone model and put it into recovery mode following the on-screen instructions.
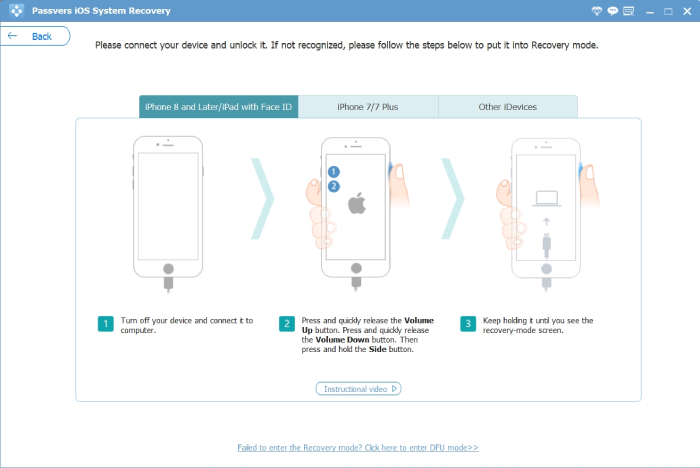
Step 4. Start to Fix iPhone No Service
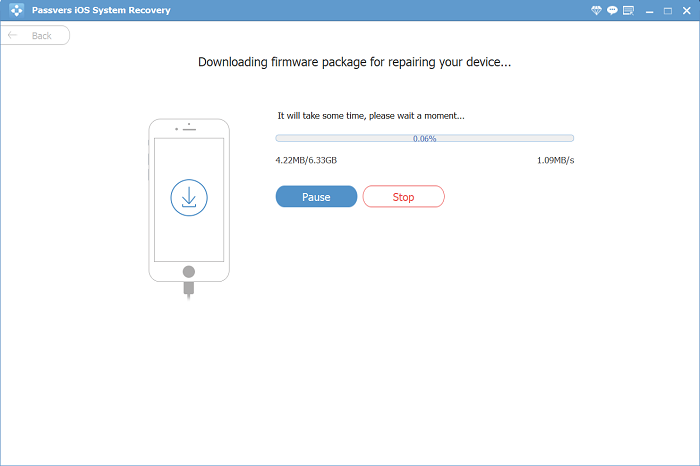
Your device model and iOS version will be detected and displayed on the screen. Confirm them, and then click "Fix" to download the corresponding firmware. When the download is completed, Passvers will start to fix the iPhone no service issue.
💡 Note:
- The iOS version may be updated to the latest one with "Standard" or "Advanced" mode;
- The repaired iPhone will be restored to its non-jailbroken state.
FAQs of How to Fix No Service on iPhone
Why does my iPhone say no service but I have WiFi?
WiFi and cellular networks are distinct. WiFi connects through a wireless router, while cellular data uses the carrier's network to provide internet and other mobile services. Therefore, they do not directly affect each other. However, when you see your iPhone says no service, you should determine whether cellular data is not enabled or if there is an issue with it. If it's the latter, you need to check the methods in this article or promptly contact your carrier for resolution.
Why does my iPhone say no SIM card?
The display of no SIM card on the iPhone is likely due to the SIM card being loose or improperly placed. To resolve this issue, you need to use a paper clip or a SIM-eject tool to remove the SIM card and then reinsert it correctly into the tray. However, another possible reason is a damaged SIM card, in which case you'll need to contact your carrier to replace the SIM card. It's important to note that when inserting a new SIM card into the iPhone, remember to go to the Settings app and update Carrier settings. Skipping this step may result in your iPhone having no service.
Conclusion
So if you encounter the iPhone no service issue, there are 8 methods available. The first seven methods focus on the iPhone restart or setting adjustment to address no service on your iPhone. If you're uncertain about the cause and prefer not to troubleshoot one by one, Passvers iOS System Recovery is highly recommended. This all-in-one repair tool can effortlessly resolve the iPhone no service issue and handle other system errors with ease. Download it, you can bid farewell to iPhone problems!