Quick Navigation
When updating or restoring your iPhone/iPad with iTunes, you might see the a message saying that "The iPad/iPhone could not be restored. An unknown error occurred (9)." This is commonly referred as Error 9. There are many potential causes for this issue, such as connection problems, device system malfunctions, iTunes software issues, or hardware failures.
If you're currently facing this troublesome issue, don't panic. This guide will detail what is Error 9 and why it occurs. We also provide you with 10 solutions. So, just join us in exploring the potential reasons behind this error and trying the methods we recommend to resolve the problem.
Key Takeaway:
- When restoring or updating your device using iTunes, make sure to use an original USB cable, the latest version of iTunes, and a computer running Windows 10 or later. If these conditions are met but you still encounter Error 9, try a different computer and make several attempts. During the process, ensure the USB cable connection remains stable and uninterrupted.
- Restoring through iTunes can be time-consuming and prone to errors. Therefore, if you're trying to fix a staggy iPhone/iPad, using the "Erase All Content and Settings" feature directly on your phone instead of iTunes is recommended.
-
If your iPhone/iPad is stuck in recovery mode, white Apple logo, black screen, etc, you can also try the Passvers iOS System Recovery tool. This efficient tool offers a free quick-fix mode that can resolve most "stuck in recovery mode" issues without lag.
What is iPad/iTunes/iPhone Error 9?
Before we explore the in-depth solutions to resolve iPad/iPhone Error 9 on iTunes/Finder, you may be wondering what this iTunes Restore Error 9 refers to. Is it similar to Error 4013/4014? Hence, let's start with a brief introduction to this problem.
Why iPad/iPhone error 9 occur?
Briefly, iPhone Error 9 is often associated with connection issues between your device and Apple servers, primarily due to unexpected disconnections and interruptions during the update or restore process. It can be triggered by several reasons, including:
- Hardware problems, such as using a non-original USB cable or charging port.
- Cable disconnection during the update or restore process.
- Some firewalls or security software may block iTunes from communicating with Apple servers.
- iTunes is currently updated to version 12.13.2, and using an older version might cause problems.
- Failure to verify the firmware being installed.
- Conflicts with other software on the computer. For instance, if you previously jailbroke your iPhone or iPad, it could cause conflicts.
When iPad/iPhone Error 9 occur?
Error 9 may occur during the process of restoring an iPhone or iPad, such as in the following scenarios:
- Syncing timeout during iTunes sync.
- Unknown error pop-up during syncing.
- Error codes like 9 or 2001-2011 during updates/restorations.
- Your iOS device is not operating at its full capacity and requires more power.
- Your device's performance improves with higher-rated USB ports (e.g., 2.0 to 3.0).
Now that you have a clear understanding of the trigger reasons, symptoms, and prompts, let's now go through some effective solutions to fix iTunes error 9.
Need to resolve the iPhone/iPad Error 9 issue at once?
Quickest Way for software issues - Passvers iOS System Recovery
[Quickest Way] Fix iPhone or iPad Fail to be Restored with Passvers
As previously mentioned, the causes of iPad/iPhone Error 9 are varied. Without a technical background, it might be difficult to pinpoint the exact cause and apply the appropriate solution. Therefore, if you don't want to spend too much time diagnosing the cause and searching for solutions, we recommend the quickest solution: using the professional repair tool Passvers iOS System Recovery.
Passvers iOS System Recovery is an expert who specializes in all kinds of iOS/iTunes issues like the iPhone/iPad Error 9. It offers 3 repair modes, including Free Quick Fix, Standard Mode, and Advanced Mode, which allow you to go fast or go deeper for a high success rate. If your iPhone/iPad encounters Error 9, freezing issues, or other problems during the restore process with iTunes, Passvers iOS System Recovery can directly fix them. Afterwards, you can proceed to restore your device with iTunes again.
Key Features of Passvers iOS System Recovery:
- Extensive Compatibility: Support from former to latest iPhone 15/iPad Pro/Air/mini.
- High Success Rate: Successfully fix any iPhone/iPad/iTunes errors with ease.
- Comprehensive Coverage: No matter what causes Error 9, it can be immediately fixed.
- Swift: Resolve the iPhone/iPad Error 9 issue in minutes, even without a password.
- Intuitive: Easy-to-follow instructions for a straightforward operation.
-
Data-preserving: Repair your device without the risk of data loss.
Notes Before Getting Start:
- Try Free Quick Fix first to solve the error 9 issue.
- If the basic mode fails, use Standard and Advanced Mode. Do note the later one may result in data loss, so it's important to back up your data beforehand.
1. Fix iPhone/iPad Error 9 with Passvers iOS System Recovery
You don't need any technique or expertise, just follow the instructions to restore iPhone/iPad without iTunes and avoid the iTunes Restore Error 9 issue.
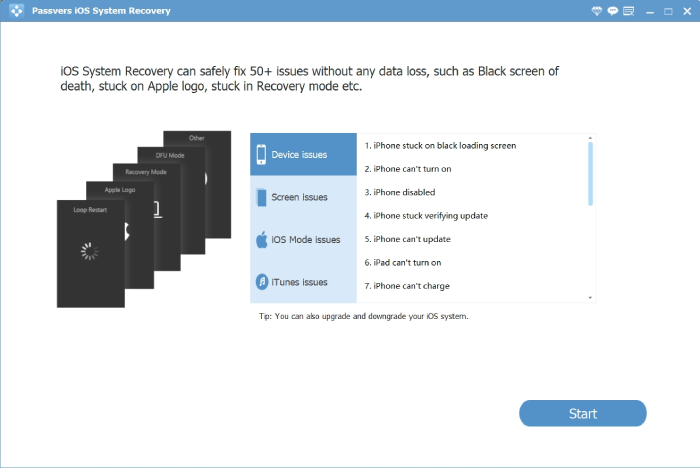
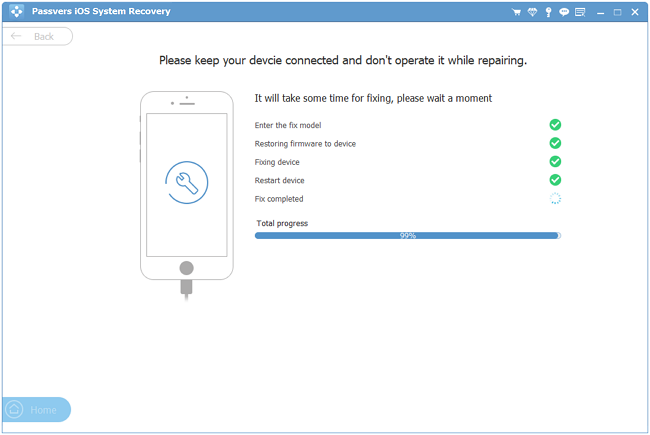
Step 1. Download and install Passvers iOS System Recovery on your desktop. Then, launch the program and click on "Start".
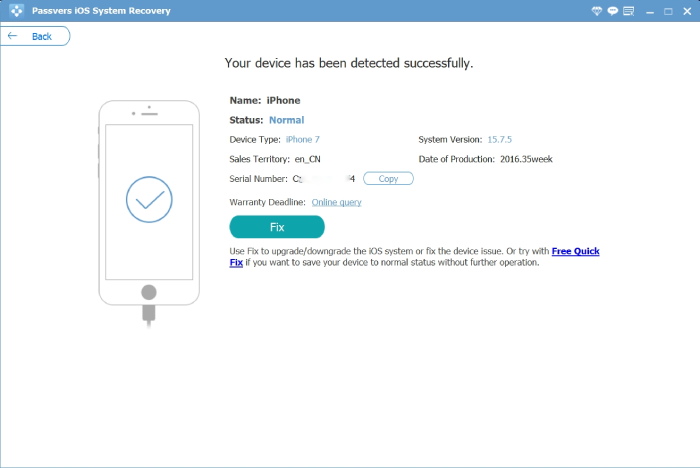
Step 2. Use a USB cable to connect your iPhone/iPad, which is experiencing iTunes Error 9, to your computer.
If Passvers iOS System Recovery detects your device automatically, simply click on the "Free Quick Fix" option displayed in the middle of the screen to begin the repair process. Free Quick Fix is available at no cost and can resolve most of the errors.
However, if your device is not detected automatically, select the "Standard Mode" (or, if needed, the "Advanced Mode") and click "Confirm" to initiate the repair.
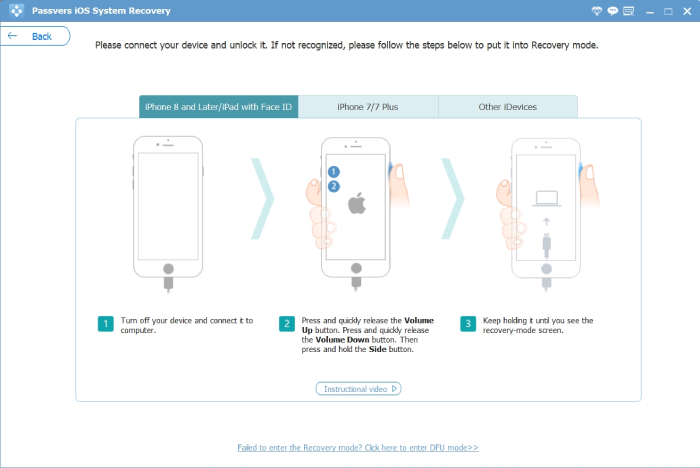
Step 3. Follow the on-screen instructions to enter Recovery Mode on your iPhone/iPad.
Step 4. In this step, it will automatically identify your iPhone/iPad and offer the appropriate firmware package for your device. If the automatic detection fails, you can manually choose the firmware package that matches your iOS model. Once you have made the selection, click "Next" to begin downloading the firmware.
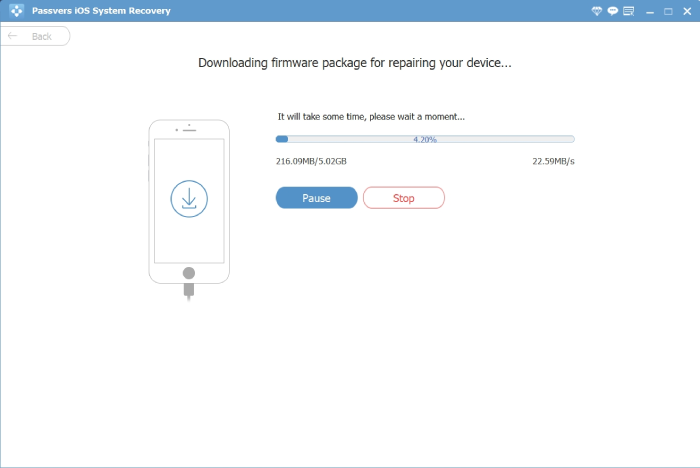
Step 5. After the download, the repair process will start automatically fixing the iPhone/iPad Error 9 problem. Please wait patiently for a few minutes. Once the repair is completed, the issue of your device's "could not be restored error 9" should be resolved. Having successfully fixed iTunes Error 9, you can now proceed to restore your device with iTunes.
3 Hardware Solutions for iPad/iPhone Error 9
If you consider the error probably comes from hardware issues, this part will tell you the solutions. Hardware issues primarily revolve around USB connections, including cables, ports, computers, and the iPhone/iPad itself. When the USB connection is disabled or loose, it can trigger iPhone Error 9 when attempting to restore or update iOS on your iPhone/iPad. You can try the following methods:
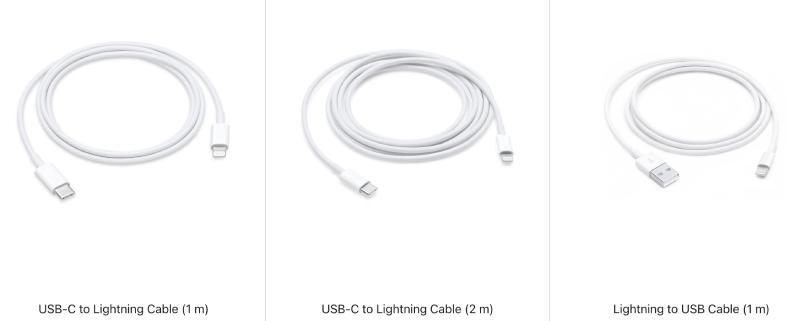
2. Check and Change Cable or USB Ports
If you're using an unqualified USB cable or a stained cable, this is highly likely to lead to the iPad/iPhone Error 9 issue. Therefore, you should make sure you're using an included USB cable or a qualified one to connect your iOS device to the computer. The best choice is to use the original USB cable. Moreover, see whether both ends or the ports are covered by dust or stains. If so, please clean up the cable and the port first. Then, establish a fresh connection again.
3. Restore iPhone/iPad with Another Computer
If your computer's processor has glitches, it may fail to restore your iPhone/iPad and thus prompt the iPhone Restore Error 9 code. This could caused by either hardware or software issues. Otherwise, the binary code in your registry may be altered somehow. Therefore, the easiest practice is to use another computer to perform an upgrade instead.
4. Reboot iOS device to Fix iTunes Error 9
Rebooting your iOS device can help resolve temporary software glitches and refresh system processes, which may also help in resolving iPad/iPhone Error 9. The method for rebooting your iPhone and iPad may vary depending on the model. You can refer to the information below to correctly reboot your device:
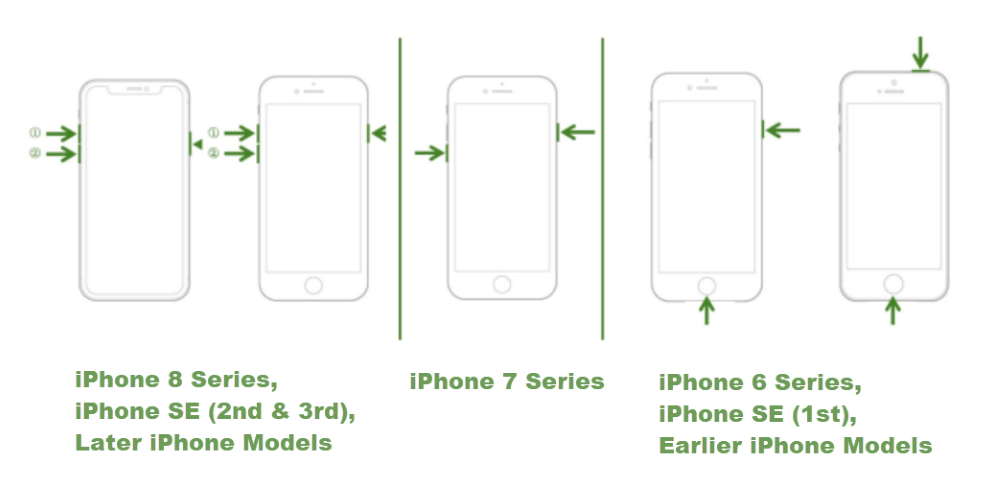
- Hard Reset iPhones:
| Model | Instructions |
|---|---|
|
iPhone 8 to iPhone 15 |
|
|
iPhone 7 Series |
Press and hold the Volume Down button and the Side button until you see the Apple Logo. |
|
iPhone 6, iPhone SE(1st generation) and former |
Press and hold the Top/Side button and the Home button until you see the Apple Logo. |
- Hard Reset iPads:
| Model | Instructions |
|---|---|
|
iPad with Home Button iPad mini: 1st-5th generations iPad: 1st-9th generations iPad Air: 1st-3rd generations iPad Pro: 9.7-inch; 10.5-inch; 12.9-inch (1st-2nd generations) |
|
|
iPad with Face ID or Top Button with Touch ID iPad mini: 6th generation iPad Air: 4th-5th generations iPad Pro: 11-inch (1st-4th generations) iPad Pro: 12.9-inch (3rd-6th generations) |
|
6 Software Solutions for iPhone/iTunes Error 9
In general, the professional tool we introduced in the second part, Passvers iOS System Recovery, can efficiently and quickly resolve the majority of software problems related to iTunes Error 9. But if you prefer to do troubleshooting manually, you can also follow the instructions below.
5. Update iTunes to the Latest Version
One possible reason is that your iTunes version is far from the latest, so you can try to update it to fix iTunes error 9.
Now there is a piece of news for you: Apple has introduced 3 new apps for Windows users that can replace iTunes functions, including Apple TV, Apple Music App and Apple Devices. Among them, the Apple Devices app works as iTunes. Therefore, you can directly download the 3 apps to help you restore, back up, and update your iOS devices. Pay attention that whichever you want to use, you have to download all the 3 apps to activate each of them.
But of course, iTunes is now still available on Windows, so you can choose to use iTunes as usual. Then Follow the steps below to update iTunes:
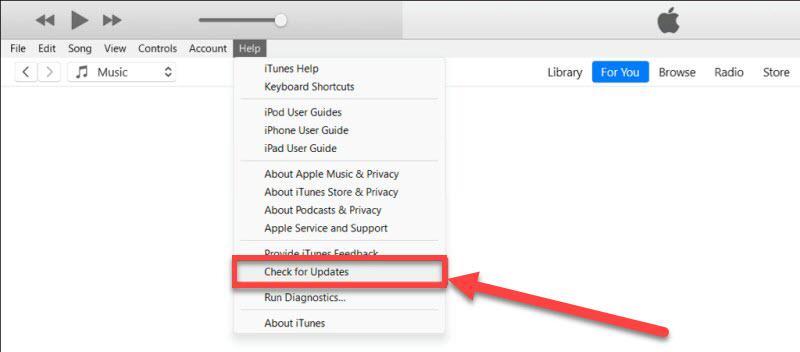
Step 1. Open iTunes on your computer.
Step 2. This step slightly differs for PC and Mac users:
- For Windows users: click the "Help" menu at the top of the iTunes window.
- For Mac users: click the "iTunes" menu at the top of the screen.
Step 3. Follow the on-screen prompts to download and install the latest version of iTunes.
Note:
Beginning with macOS Catalina (10.15), Apple no longer supports the iTunes app, so you won't find iTunes on your Mac anymore. That means if you're dealing with iTunes Error 9 on Mac, things will become more difficult. One practical option is to use a professional third-party tool like Passvers iOS System Recovery which can help you resolve the issue effectively.
6. Check for System Update
Besides updating iTunes to the latest version, it's also important to check your computer system to ensure it is up to date. Newer operating systems often include updated drivers and software that improve compatibility with the latest versions of iTunes and iOS devices. Thus, the system update may help resolve an unknown error occurred (9). Here are the specific methods to check and update your system:
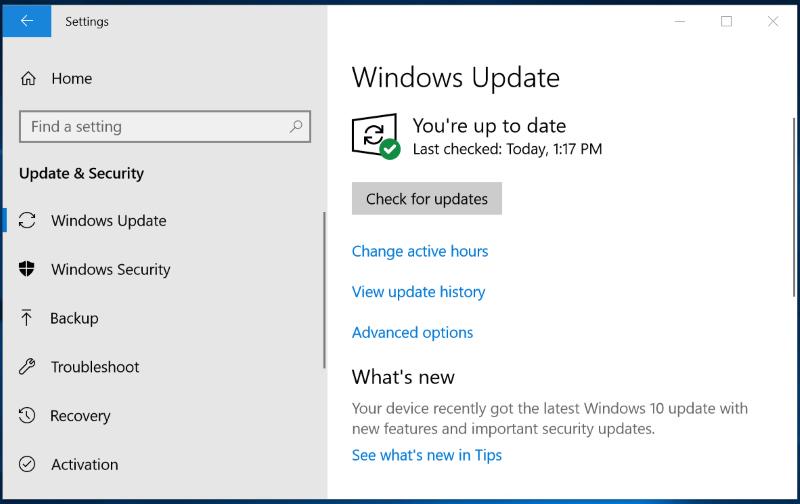
- For Windows users:
- Type "Windows Update" in the Windows search bar and open it.
- Click "Check for updates" to see if there are any available updates.
- If updates are available, click "Install now" and follow the on-screen instructions.
- If no updates are available, you can check your Windows version by going to Settings > Home > About and looking under "Windows specifications." Ensure your system is Windows 10 or later.
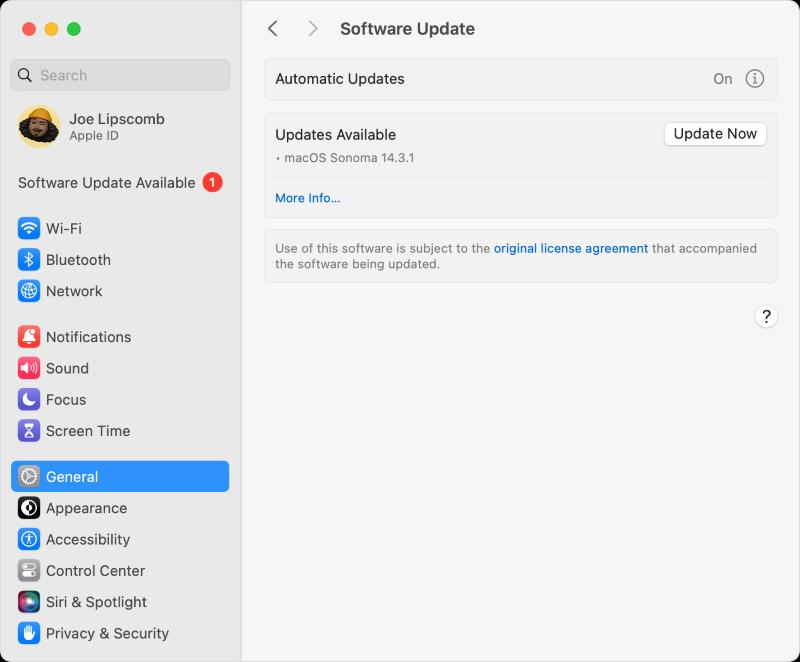
- For MacOS Users:
- Click the Apple logo in the top left corner of the screen.
- Select "System Preferences" or "System Settings."
- In the opened window, either select "Software Update" directly or go to General > Software Update.
- The system will automatically check for available updates. If updates are available, relevant information will be displayed.
- Click "Update Now" or "Install Now" and follow the on-screen instructions to complete the update process.
- If no new software is available, it will indicate that your Mac is already up to date.
Note:
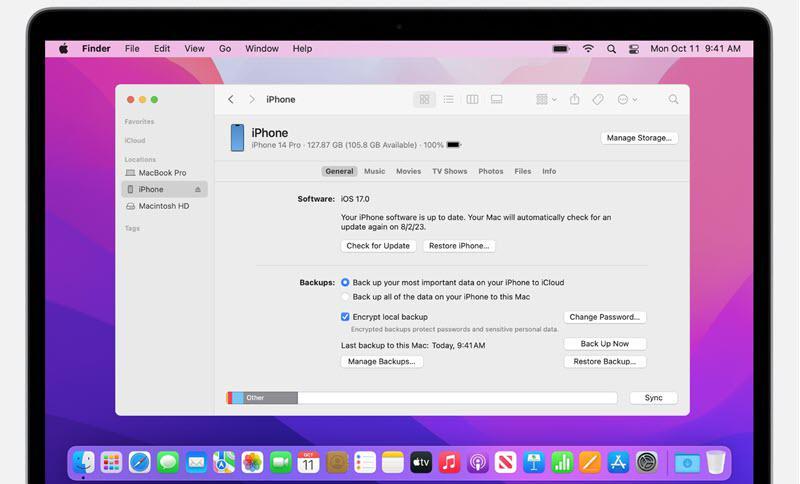
In macOS Catalina 10.15 or later, iTunes has been replaced by Finder. So if you're running this macOS, you can use Finder to update and restore your iPad/iPhone.
7. Disconnect Other Devices From Your Computer
For work purposes, your computer may sometimes be connected to other devices, such as USB drives, external hard drives, printers, etc. However, connecting multiple devices simultaneously can consume excessive system resources, potentially leading to system crashes or interference with the communication between your iPhone/iPad and the computer. This reduced stability can cause Error 9 to appear.
Therefore, it is recommended to disconnect all unnecessary USB devices and external hardware from your computer, leaving only the iPhone/iPad connected. This can help prevent iPhone Error 9 during the update or restore process.
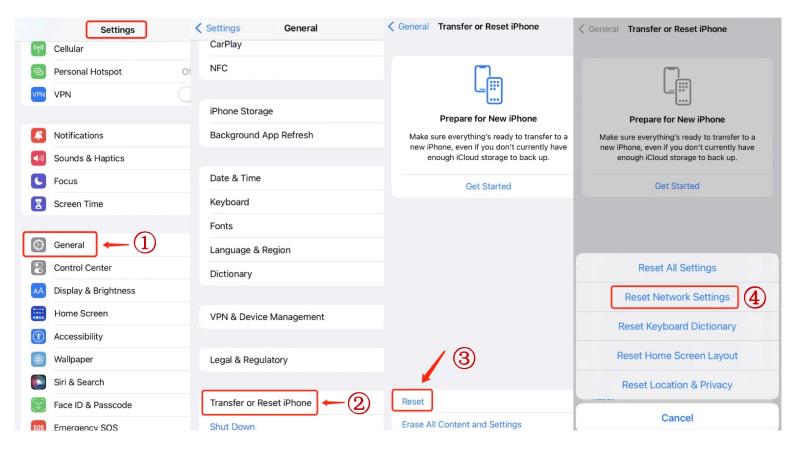
8. Reset the Network Settings
Sometimes, incorrect network configurations can lead to iPad/iPhone Error 9 on iTunes. You can follow the steps below to check and reconfigure your network:
Step 1. Open the Settings page on your iPhone/iPad and click "General".
Step 2. Scroll down the page and click "Transfer or Reset iPhone."
Step 3. Click "Reset" at the bottom of the page.
Step 4. Click "Reset Network Settings" to begin resetting your network.
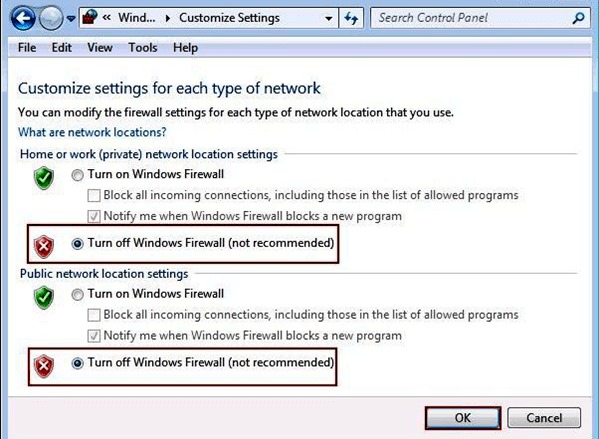
9. Check Security/ Anti-virus / Firewall Settings on Computer
It is also worth checking your security software, anti-virus, and firewall settings when you are encountering iTunes Error 9 because these settings can sometimes interfere with the iTunes restore process. The 3 steps below can help you to check and adjust the settings on your computer:
Step 1. Open your Antivirus software and navigate to its Settings. Look for an option to disable or turn it off temporarily.
Step 2. Disable the Firewall by following these steps:
For Windows users:
- Open the Control Panel.
- Click "System and Security" > "Windows Firewall".
- On the left side, click "Turn Windows Firewall on or off".
- Select "Turn off Windows Firewall(not recommend)" in both the "Private network settings" and "Public network settings" sections.
For Mac users:
- Open the System Settings or System Preferences from the Apple menu.
- Click "Network" > "Firewall".
- Turn off the Firewall.
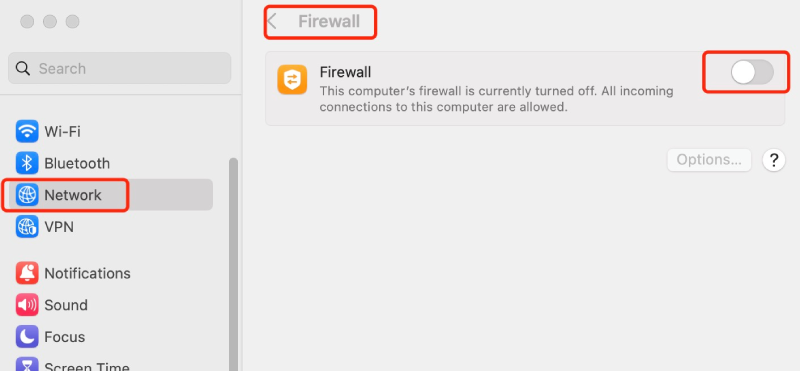
Step 3. Check whether the iPhone/iPad Error 9 has been resolved or not.
By performing these steps, you can temporarily disable your Antivirus software and Firewall to eliminate possible interference that may cause iTunes Error 9. After verifying, you can turn them on again.
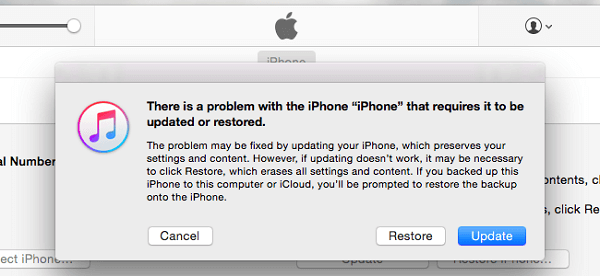
10. Fix iTunes Error 9 with iOS Update
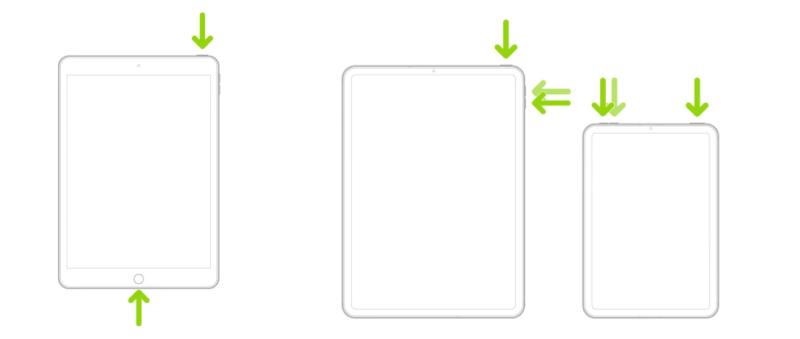
Recovery Mode is also a common method to fix the "iPhone/iPad could not be restored. An unknown error occurred (9)". We will now provide you with detailed steps. However, please note that using recovery mode may result in data loss. Therefore, if necessary, please ensure that you have backed up your data before proceeding with the repair.
Step 1. Turn off your iPhone.
Step 2. As the instructions for putting a device into recovery mode vary by model, please find the instructions corresponding to your device below and follow them accordingly.
iPhone SE (1st generation) and iPhone 6s and earlier: Press and hold the Home button.
iPhone 7 and iPhone 7 Plus: Press and hold the Volume Down button.
iPhone 8, and later, including iPhone SE (2nd and 3rd generation): Press and hold the Side button.
While holding the button mentioned above based on your model, connect your iPhone to your computer immediately. Then, you will see a white Apple logo. Continue holding the button until a screen of a computer and a lightning cable appears.
Step 3. After your computer successfully detects your device, you should see options for either "Restore" or "Update". Click "Update", and your computer will attempt to reinstall the software.
Step 4. Once the restore process is complete, your iPhone/iPad will restart. Follow the on-screen instructions to set up your device again.
Conclusion
Depending on hardware or software causes, there are different ways to fix iPad/iPhone Error 9 on iTunes. You may try first to change a USB cable, use another computer, or hard reboot your device to exclude possible hardware issues. If you want to quickly solve iOS/iTunes issues, Passvers iOS System Recovery offers a free fix to troubleshoot iTunes Error 9 for free without data loss. Now, why not give it a shot and you'll see.