Quick Navigation
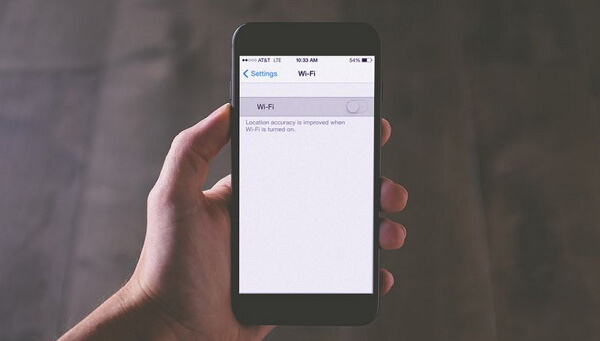
"This afternoon, as I returned home intending to connect to Wi-Fi to watch a movie, I was taken aback when I noticed that the Wi-Fi icon had turned gray. No matter how many times I tried clicking on it, there was no response. I'm unsure about what to do in this situation."
Many iPhone users have shared similar experiences, finding themselves unable to connect to wireless networks. This seemingly small hiccup can not only bring inconvenience to people's daily lives but also increase the cost of internet usage. So, what can be done to address this issue? Fear not! This article reveals eight comprehensive solutions to restore your Wi-Fi functionality. Whether you're encountering this problem on the latest iPhone or an older model, we've got you covered.
NOTE:
The ultimate solution Passvers iOS System Recovery stands out as the most comprehensive and foolproof method to swiftly resolve the vexing iPhone Wi-Fi greyed-out issue. With a stellar success rate, it caters to all iOS systems and iPhone models, ensuring a seamless and hassle-free experience. Say goodbye to connectivity woes and unlock the full potential of your iPhone with Passvers.
Why Wi-Fi greyed Out on iPhone?
Users across various iPhone models, whether the relatively newer iPhone 13/14 or the older iPhone X/8/7/6/5/4, as well as iPad models, have reported that they fail to enable Wi-Fi because the Wi-Fi button is grayed out or dim. This issue can stem from various factors. Here are some of the most possible reasons we've concluded:
- The error may be caused by the negative effects of the iOS version, which brings some bugs to your iPhone. For instance, many users have reported connectivity issues after updating to iOS 13, iOS 14, and even iOS 16.
- Hardware problem or system issue on your iOS device.
- The Wi-Fi antenna in your iPhone/iPad is shorted out or damaged.
If you're unsure about the specific reason causing your Wi-Fi button to turn grey, you can follow along as we systematically troubleshoot through various solutions. It's important to note that not every method presented here may be applicable to your situation, so choose the one that suits your circumstances best.
Solution 1. Disable Airplane Mode
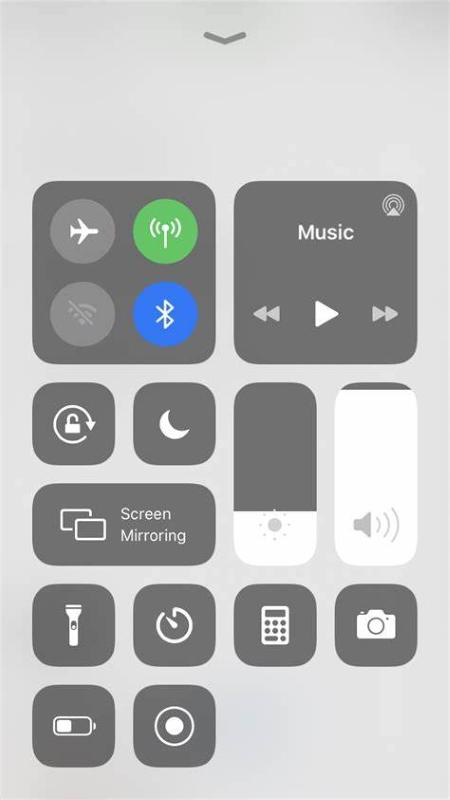
Let's start with the simplest method first—Airplane Mode checking. If Airplane Mode is enabled on your iPhone or iPad, the cellular radio, the wireless transmission functions, Wi-Fi, and Bluetooth will be turned off and you are not allowed to use them. So, the priority is to check if your device's Airplane mode is enabled. If it is, you can see an aircraft icon would be shown on the Status Bar.
To disable Airplane Mode, swipe up from the bottom or swipe down from the top-right corner of your iOS screen to open the Control Center. Then find out the "Airplane Mode" icon to turn it off. After disabling Airplane Mode, wait for a few seconds and observe if the Wi-Fi icon becomes active and no longer greyed out.
Solution 2. Disable Cellular
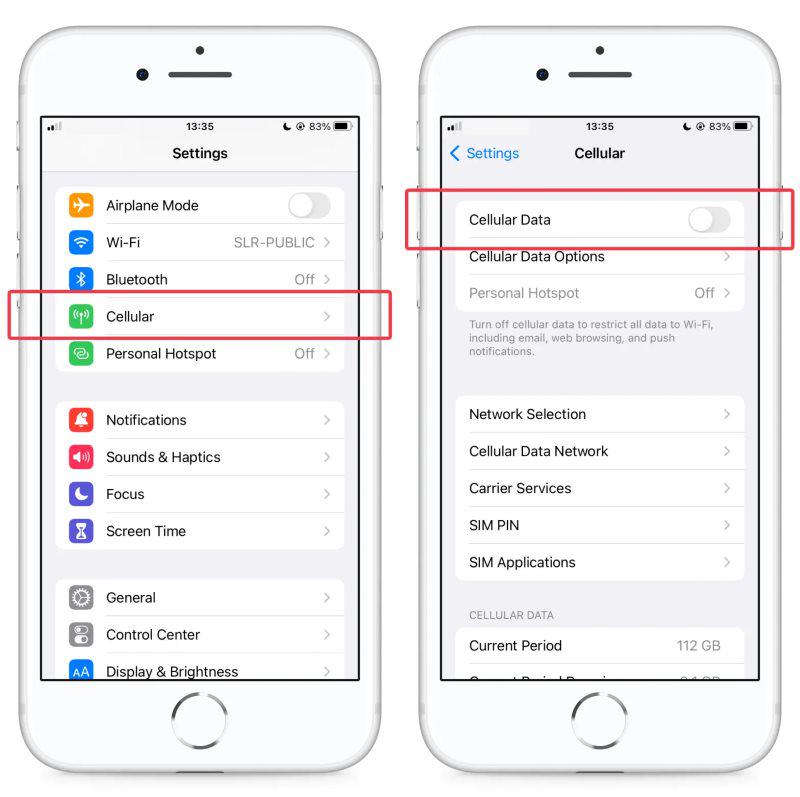
In certain situations, conflicts may arise between mobile data and Wi-Fi, resulting in a greyed-out Wi-Fi button. Therefore, you can attempt to manually disable mobile data to see if it can revive the Wi-Fi connection. Turning off mobile data might trigger a reset of the network connections. During the reconnection process, the device may reassess the available connection options, potentially resolving the issue of the greyed-out Wi-Fi button.
To disable cellular, navigate to the "Settings" app on your iPhone. Then, scroll down and tap on "Cellular" or "Mobile Data". Find the switch for "Cellular Data" and toggle it off. This action temporarily turns off your cellular data connection. Wait for a few moments, return to the main settings page, and try enabling Wi-Fi again. Check if the Wi-Fi button is now responsive and no longer greyed out.
Solution 3. Restart iPhone
If the two methods mentioned above fail to resolve your issue, a simple restart can often work wonders. Below are two methods to restart your iPhone:
Option 1. Restart iPhone via Settings
- Open the "Settings" app on your iPhone.
- Scroll down and tap on "General."
- Scroll to the bottom and select "Shut Down."
- Drag the slider to turn off your iPhone.
- After your iPhone is completely powered down, hold down the side or home button until you see the Apple logo, indicating that your device is restarting.
Option 2. Restart iPhone Manually
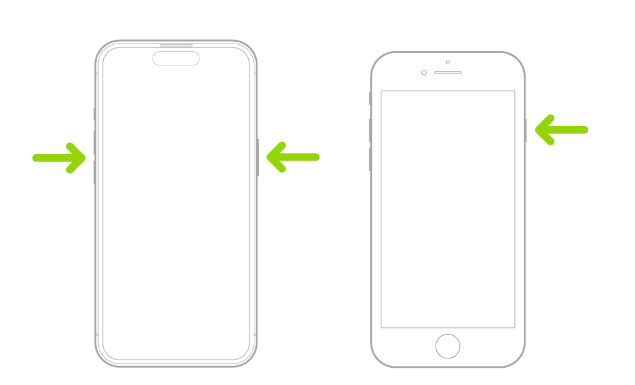
For iPhone models with Face ID (iPhone X and later, including the latest models):
- Press and hold the side button along with the volume down button until the slider appears.
- Drag the slider, and wait 30 seconds for your device to turn off.
- Once it's off, press and hold the side button until you see the Apple logo.
For iPhone models with a Home button (iPhone 8 and earlier):
- Press and hold the right side button until the slider appears.
- Drag the slider, and wait 30 seconds for your device to turn off.
- After your iPhone turns off, press and hold the top (or side) button again until you see the Apple logo.
After the restart, check if the Wi-Fi button is now responsive and no longer greyed out. If the issue persists, you may need to explore additional solutions to address the underlying problem.
Solution 4. Reset Network Settings
If the issue persists, try resetting the network settings on your iPhone. The settings will erase and restore all network-related configurations to their default state. This aids in correcting potential configuration errors or conflicts that may be causing the Wi-Fi button to appear greyed out.
It's important to note that while resetting network settings can address many network-related issues, it will clear all stored network information on the device, including Wi-Fi passwords. Therefore, before proceeding with this operation, ensure that you are aware of all the information needed to reconfigure your network connections.
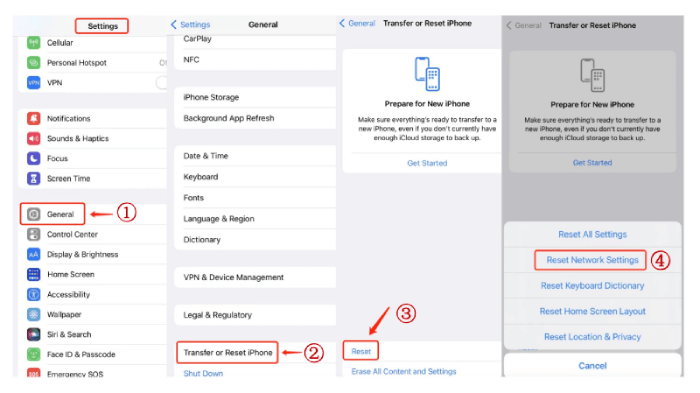
To reset Network Settings, just go to "Settings > General > Reset > Reset Network Settings" on your iPhone or iPad and then enter your device passcode to confirm the operation. After the network settings are reset, restart your iPhone by powering it off and then turning it back on. Check if your Wi-Fi is now functioning as expected.
Solution 5. Reset All Settings
If even resetting Network Settings doesn't help, it is time for the most powerful solution: perform a factory reset. This step will restore system settings to their default configurations without affecting your data. However, be aware that it will remove personalized preferences, such as wallpaper and accessibility settings. Here's how you can proceed:
- Launch the "Settings" app on your iPhone.
- Then scroll down and tap on "General > Reset > Reset All Settings" from the list of options.
- Enter your device passcode to confirm your decision to reset all settings. This action will not delete your data but will revert system settings to their defaults.
- After the reset, restart your iPhone.
- Go back to Settings, and check if the Wi-Fi button is now responsive.
Solution 6. Update iOS System to the Latest Version
As mentioned earlier, the greyed-out Wi-Fi issue may stem from system-related problems. Fortunately, Apple releases a new iOS version every year to address bugs and enhance system functions. Therefore, if the previous methods prove ineffective for you, and a new version is available, consider updating your iPhone to the latest iOS version. Below are two methods to facilitate the update, either directly on the device or using iTunes:
Option 1. Update on iPhone
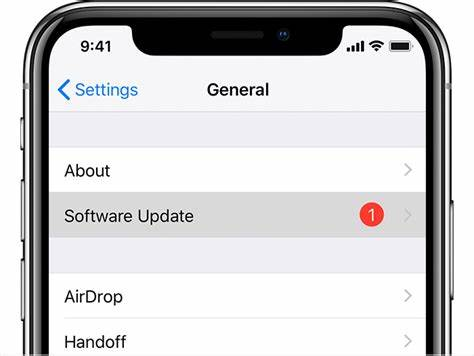
- Head to "Settings > General > Software Update".
- If an update is available, tap "Download and Install" and enter your passcode.
- Your iPhone will download and install the latest iOS version.
Option 2. Update with iTunes
- Connect your iPhone to your computer using a USB cable.
- Launch iTunes on your computer.
- Click on the device icon in the upper-left corner of iTunes.
- In the "Summary" tab, click on "Check for Update".
- If an update is available, click "Download and Update".
- Follow the on-screen instructions to complete the update process.
Solution 7. Restore iPhone with iTunes
If the Wi-Fi issue persists and other troubleshooting methods have not been successful, may consider attempting to reset your iPhone's settings and content using iTunes. This method is effective in addressing a majority of system-related issues. However, this process will erase all data and settings on your device, returning it to a factory-fresh state. So, before proceeding, it's crucial to back up your data to avoid permanent loss. Here's how you can restore your iPhone with iTunes:
- Connect your iPhone to the computer with a USB cable.
- In iTunes, locate and click on your device icon in the upper-left corner.
- Under the "Summary" tab, you will find the "Restore iPhone" option.
- Click on "Restore iPhone" and confirm your decision when prompted.
- iTunes will erase all data on your iPhone and install the latest iOS version. Once the restore process is complete, you can set up your iPhone as new or restore from a backup.
If you prefer not to use iTunes for restoring, you can also explore Finder, iCloud, or third-party tools for alternative methods.

Solution 8. Ultimate Way to Fix iPhone Wi-Fi Greyed Out🔥
When other methods fall short, Passvers iOS System Recovery emerges as the ultimate solution. As its name suggests, this third-party software is capable of resolving over 50 types of iOS system issues, including black screen, update failures, and the notorious Wi-Fi grey-out problem that can be attributed to system issues.
Why Passvers iOS System Recovery Stands Out?
1. One-Stop Solution: Passvers iOS System Recovery provides an all-in-one solution, addressing the root causes of system-related issues in a single process.
2. High Success Rate: Passvers iOS System Recovery boasts three recovery modes, each tailored to address various levels of system issues, contributing to its impressive success rate.
- Free Quick Fix: Addresses common issues with a swift, no-hassle solution.
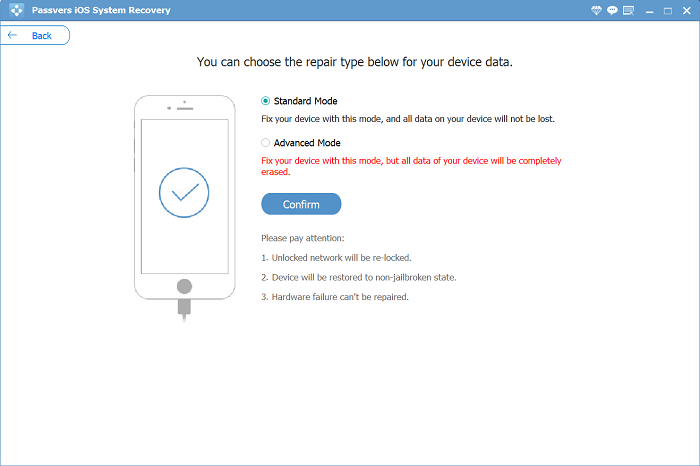
- Standard Mode: Tackles more complex problems without data loss.
- Advanced Mode: Offers a comprehensive solution for severe system issues, ensuring the highest success rate.
3. Compatibility: Passvers iOS System Recovery is compatible with all iOS systems and iPhone models, including the latest iPhone 15 lineup and iOS 17.
4. User-Friendly: With its intuitive interface, Passvers iOS System Recovery simplifies the recovery process, making it accessible even for users with limited technical expertise. No technical knowledge is required – three simple steps get the job done.
Here is how it works:
Step 1. Download and install iOS System Recovery on your computer. Connect the iPhone or iPad to the computer. Choose your needed repair mode and then click on the "Confirm" button.
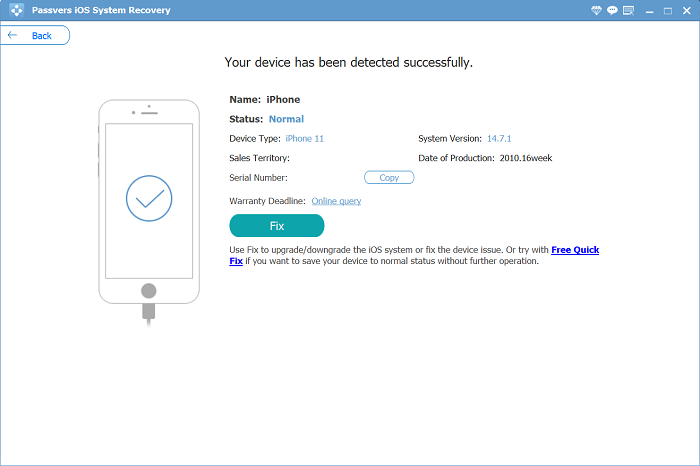
Step 2. Check if the device information is correct. And then click on the "Fix" button to proceed to the next step.
Step 3. Select the correct category for your iOS device and it will automatically download the corresponding firmware package for you.

Step 4. It will start to repair your device and please keep your iOS connected. When the process is complete, your mobile may restart to normal mode.

In conclusion, we've outlined eight methods to address the issue of a greyed-out Wi-Fi on your iPhone. Feel free to try each one to find the most suitable solution for your situation. However, if you don't want to spend any more time exploring other options, you can opt for Passvers iOS System Recovery directly. It offers a one-stop solution with an exceptionally high success rate, compatible with all iOS systems and iPhone models.
If you have any problem with this article, just leave us a comment below.